CC Energy Bites

It’s like making cake pops and no bake cookies – but healthy. All the fun without the sugar – and they said it couldn’t be done.

Get creative with these little guys – use this recipe, or any other you come across, as a guide. Don’t have peanut butter, use almond butter. If ya don’t like raisins, use dried figs. I could keep going but I think you get it.

I’m sucker for basically any nut butter so whenever I see them on sale, one or the whole shelf ends up in my cart. (No MasterCard, those aren’t fraudulent charges. Meijer had organic sunbutter on sale.)

Speaking of finding nut butter on sale, Costco had a 2lb jar of Cashew butter priced at like $4 a few months back. In an amazing display of self-control, I only bought one. Which is a good thing because I swear there is no bottom to this jar.

Once I decided to make energy bites, I busted said cashew butter outta the fridge.

Pro tip: Not all nut butters have the same consistency. Adjust your wet ingredients until the right consistency of your “batter” is achieved. Basically, “wet” enough that they don’t crumble when you bit into them but not too “wet” where they lose their shape or leave your hands feeling really greasy or sticky.

{CC Energy Bites}

[Ingredients]

  • 1 cup cashew butter
  • 3/4 cup salted cashews
  • 3-4 pitted medjool dates
  • 1 cup old fashioned oats
  • 3 tbsp honey
  • 1 tbsp agave nectar
  • 1/2 tsp cinnamon
  • 3 tbsp unsweetened coconut flakes
  • 3 tbsp ground flax seed
  • 2 tbsp chia

[Directions]

  1. Add all ingredients to your blender or food processor. Pulse until combined and crumbly.
  2. Using a large cookie batter scoop, roll the dough in your hand to form bite size balls. Or press dough into a parchment lined baking dish.
  3. Store balls or bars in an airtight container in the fridge for up to 7 days.

Cheers,

Danielle

Wilted Greens Soup

Summer isn’t really hot soup season but it is cold soup season – gazpacho any one?

My intent was to make this soup tasty chilled or warm, but it was my first go at this style and I preferred it warm. Not such a bad thing, as it turns out, because while summer is certainly hot outside, it is all too often FREEZING inside thanks to the A/C.

Inspired by this recipe, I put my sad, somewhat soggy, Spring Mix to good use. Upon further inspection, I found several other veggies who had seen better days. Throwing caution to the wind, everything on it’s last leg was added to the soup.

Being dairy free has expanded my culinary skills and creativity. How to make a soup rich and creamy without cheese or milk? Cashews, of course. And in this case, cashews and a few Brazil nuts. Cashew cream (soaked then pureed cashews) are often used to replace cheese and cream in vegan recipes. I’ve used it in several dishes and love the rich, creamy nuttiness it adds. I’m beginning to experiment with other nuts to see how they compare.

An emulsion blender or high-speed blender is required for this recipe. I made the soup super creamy, but if you prefer more texture you can always blend half and leave the other portion unblended.


The type of greens and veggies you use will affect the color of your soup. My spring mix was full of dark greens and deep purples, that in combination with the other vegetables gave my soup a rather unappealing brownish color. However, once the cashew cream was added, it became a light mossy color. Perhaps not the prettiest, but it was flavorful and kept me from throwing away food. Win, win in my book.

{Wilted Greens Soup}

[Ingredients]

  • ~2 cups wilted greens
  • 2-3 carrots
  • 1 summer squash
  • 1 fire roasted red pepper or bell pepper
  • 1/3 cup cashews + 2-3 Brazil nuts
  • 2-3 stalks celery
  • 2 cloves garlic
  • 1/4 red onion
  • 1 can chickpeas, undrained
  • 1 carton vegetable stock
  • 1 TBSP fresh basil
  • Salt & pepper to taste
  • ~1/2 TBSP herbes de provence
  • 1-2 TBSP olive oil
  • 2 TBSP tahini

[Directions]

  1. Add cashews + brazil nuts to a deep bowl. Cover with water, soak for at least one hour.
  2. Rinse and coarsely chop veggies.
  3. Add olive oil to pan, heat over a medium flame then saute onion until tender and translucent.
  4. Add summer squash, bell pepper, and carrots. Salt & pepper to taste. Cook for 5-10 minutes.
  5. Add greens, chickpeas along with the fluid from the can, garlic, and stock.
  6. Stir in basil and herbes de provence. Cover and allow to simmer for 30-45 minutes.
  7. Once nuts have soaked for at least an hour, drain most of the water from the dish then add the nuts and remaining water along with the tahini to a food processor. Blend until smooth.
  8. Using an emulsion blender or regular blender, blend soup until smooth. Add cashew cream and stir until well incorporated.

Note: my husband added a dash of Sriracha to his to give it some spice.

Cheers,

Danielle

Eat Local Series :: Carlson Farm

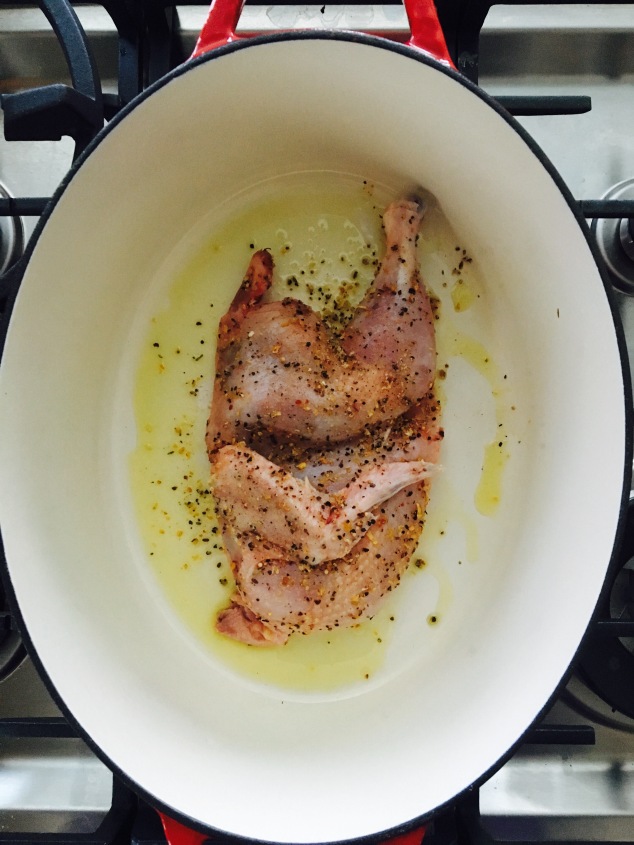
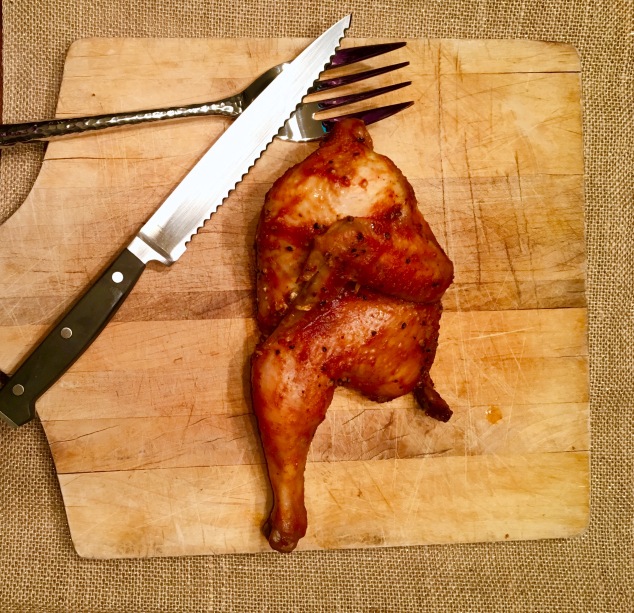
Never one to disappoint, Norm’s half chicken was a big hit!

I have to say that I so enjoyed the simplicity of this meal. I reheated leftover grits, roasted some veggies, and put the half chicken on the stove in my dutch oven. With a snap of my fingers, dinner was ready. Go ahead and call me a Domestic Diva or Cooking Queen – I’ll answer to either 🙂

My husband could not stop raving about how delicious the chicken was (less because of me, more because of the way it was raised). The man CLEANED every piece of meat off the bones and was utterly defeated when he learned I hadn’t cooked both halves.

Keeping with eating local, I used a BBQ glaze by American Spoon, which is based out of Saugatuck, MI.

You can buy the glaze here: https://www.spoon.com/maple-bbq-grilling-sauce.html

On a side note: Their Bloody Mary mix is the answer to every Bloody Mary drinker looking for a twist on their hot tomato cocktail. American Spoon adds horseradish to their mix which gives a nice little firey kick to your taste buds.

{Half Chicken with Maple BBQ }

[Ingredients]

  • 1 half chicken from Carlson Farms
  • 2-3 TBSP Montreal Steak seasoning
  • 1/4 cup Maple BBQ Grilling Sauce
  • 1 TBSP EVOO
  • ~1 cup vegetable stock

[Directions]

  1. Add the olive oil to the bottom of your dutch oven, place on stove over medium-high heat. FullSizeRender (1)
  2. Generously season chicken with seasoning, patting the seasoning into the chicken.
  3. Place chicken in dutch oven, meatier side up to start, and cover. Reduce heat to medium.
  4. Cook for 3-5 minutes then flip. Add a splash of vegetable stock to dutch oven to ensure that the chicken will not stick to the bottom and to keep the meat moist.
  5. After 3-5 minutes, return the chicken to meat side up and glaze with about 1/3 of the sauce. Add additional stock to the bottom of the dutch oven, if necessary. Cover and allow to cook for a few minutes then flip and repeat.
  6. For the last 3-5 minutes of cooking, return the chicken to meat side up, and glaze with remaining sauce. Turn off heat and cover until ready to serve.

FullSizeRender

Cheers,

Danielle

No Bake Oatmeal Chia Cookies

‘Tis the season for cookie exchanges and crazy busy schedules.

We are having our clinic Christmas Party and Cookie Exchange today and I made Chocolate dipped Pretzels (my FAVORITE holiday treat) and these no bakes, which may be my new favorite.

These little gems come together really quickly and, if you have little ones, are kid-friendly in preparation. I can always remember helping my mom bake around the holidays and they are some of my fondest memories with her.

If you’re on the 21 Day Fix, these are loosely based off a recipe that Autumn includes in her book.

Rather than milk chocolate, these no bakes are made with Cocoa Powder (a superfood!) and dark chocolate (another superfood!) powder. Natural peanut butter and sunbutter add the perfect bit of salty flavor and the coconut oil and flakes finish it off with a divine sweetness. The oatmeal and chia seeds are full of fiber to keep you full after enjoying one or two.

{No Bake Oatmeal Chia Cookies}

[Ingredients]

  • 2 1/2 cups oatmeal
  • 1/2 bag of sweetened coconut flakes
  • 1 1/2 TBSP chia seeds
  • 1/2 cup sunflower butter
  • 1/2 cup peanut butter
  • 1/2 cup melted coconut oil
  • 2 tsp vanilla extract
  • 3 TBSP Cocoa Powder
  • 3 TBSP Dark Chocolate Powder

[Directions]

  1. Melt coconut oil, peanut butter, and sunflower butter in a microwave safe bowl.
  2. Once melted, mix in cacao powder and dark chocolate powder until combined.
  3. Add oatmeal, coconut flakes, and chia seeds and mix until combined.
  4. Using a cookie scoop, form cookies and place on parchment paper and refrigerate.

Cheers,

Danielle

Rosemary Garlic Hummus

So, to be fair and honest – the last post was written over a month ago. I FINALLY got around to making the graphic for it and then published it.

I’m disappointed that I took such a long break from blogging. It is a great outlet for my creative energy and a good way to process all the chaos of life. When I have to sit down long enough to string coherent thoughts together, I’m able to figure out why I’m feeling the way I am. Cooking is and always has been a stress reliever for me and I so enjoy sharing this passion with other people. I’m feeling renewed, inspired, and ready to jump back into blogging! 🙂

I am proud to say that I hosted Thanksgiving this year, despite an oven that decided to up and quit just about a week before. Both turkeys turned out really well and I made created my own cranberry sauce recipe that everyone loved (humble brag intended).

I had planned on making a spread of appetizers but people trickled in so close to when the grand feast would be ready, we ended up just munching on this hummus. Its a nice change from the normal varities that you’d find in the grocery store. Plus, homemade is free of the extra oils that store bought hummus tends to contain.

I’ve been making my own hummus for years. Trying out different recipes, combining recipes, or just making things up as I go along. The first few attempts didn’t turn out too well – I got thick, crumbly hummus instead of smooth and spreadable. I’m hear to tell ya, I’ve uncovered the secret to create smooth, creamy hummus. And because I’m nice, I’m going to share it with you so you don’t have to suffer through not so great hummus.

The trick is drain about 2/3 of the water off the chickpeas then add the remaining water and chickpeas to your food processor to make your hummus. So simple, right? I’m really hoping at least one other person didn’t know this so I don’t sound like an idiot 🙂

I also left my food processor on a few minutes longer than what I have done in the past. This helped to create almost a “whipped” consistency.

{Rosemary Garlic Hummus}

[Ingredients]

  • 1 can Chickpeas, 1/3 of the liquid remaining (or Garbonzo beans)
  • 1/4 cup olive oil
  • 1/4 cup tahini
  • 3-5 sprigs of fresh rosemary
  • Juice from half of a lemon
  • 3 garlic cloves
  • Pinch of salt and pepper

[Directions]

  1. Drain 2/3 of liquid off chickpeas, add what remians to food processor.
  2. Add remaning ingredients
  3. Put food processor on high and blend 3 to 5 minutes, or until smooth and creamy.
  4. Serve with fresh celery, carrots, cucumber, and pita points.

Cheers,

Danielle


And so it begins….

I am officially a Dietetic Intern! It still seems surreal and it is hard to put into words the feelings of excitement, anticipation, and anxiety that are all floating around.

I plan to write about my experiences as I go through each rotation. I’ve read through several blogs that have chronicled internships and all have had their share of great stories.

In other news, I came across the article linked below and wanted to share it with you all.

http://www.eatclean.com/scoops/5-health-food-myths

eatclean.com is super and informative, I’d encourage you all to head there and take a peak.

I have another sangria recipe I’ll be posting tomorrow, be sure to check back in for that 🙂

Cheers,

Danielle

Gluten-Free Banana Bread

I have been gluten-free since about age 9, not having bread is nothing new to me. And honestly, most times I don’t miss it.  Truth be told, I really only “crave” bread when I make a grilled cheese for the hubs. Some one needs to invent a gluten-free, dairy-free version of that sammy 😉 Not that it would taste remotely like the real thing…. but I’m here to tell you about banana bread.

I guess I lied earlier, banana bread is one thing I tend to miss too. There is an easy fix for that – the recipe below.  There are always ‘nanners in my house but they rarely go unused long enough to make good banana bread. So when I had a bunch ripen much faster than I expected, it was the first sign that I should treat myself to making a loaf. The second sign came a few days later when I found out a friend’s mom just eliminated gluten from her diet. For those who have gone gluten-free later in life, you know how challenging the transition is. Old habits die hard, carb habits die much harder. Since I almost never finish a loaf by myself and sharing gluten-free banana bread with those who can have the real things is sac-religious, I knew my friend’s mom needed this little glimmer of hope in her new gluten-free life.

New recipes always bear fun little surprises. Either I read the original recipe incorrectly or my tweaking to it created more batter. In any case, coming back into the kitchen from folding laundry to find my banana bread was overflowing from the loaf pan was not a fun surprise. With some quick maneuvering, I was able to save my oven from being a mess and get a bonus  mini loaf of ‘nanner bread.

The texture and flavor is awesome, life is good, and it’s Friday.

The original recipe is at this link: http://tiaskitchen.com/gluten-free-banana-bread-dairy-free-and-vegan/

{Gluten-free Banana Bread}

[Ingredients]

  • 2 cups Gluten-free Flour blend (I used Kinnikinnick’s Bread flour)
  • 3/4 cup brown sugar
  • 1 tsp baking soda
  • 1 tsp baking powder
  • 1/2 TBSP cinnamon
  • 1/2 tsp salt
  • 3 medium, very ripe, bananas
  • 1 tsp vanilla extract
  • 2 eggs
  • 1/2 cup melted coconut oil

[Directions]

  1. Preheat oven to 350F
  2. Mash bananas. I used my KitchenAid mixer with the whisk attachment on low.
  3. Add brown sugar and mix until just combined being careful not to overmix.
  4. Add egg, oil, and vanilla. Mix until just combined, again being cautious not to overmix.
  5. In a separate bowl, combine GF flour, baking soda, baking powder, salt, and cinnamon.
  6. Add dry ingredients to wet in increments of about 1 cup at a time. Mix in dry to wet until moistened then add next cup of dry mixture. Repeat until all of the dry ingredients have been incorporated into the wet.
  7. Pour 3/4 of batter into a greased loaf pan. Pour remainder into a greased smaller loaf pan or any other oven safe receptacle.
  8. Bake for 45-50 minutes. I covered mine just over halfway through with foil to prevent the top from being too dark.
  9. Cool in pan for about 10 minutes then transfer to cooling rack.

Cheers,

Danielle