CC Energy Bites

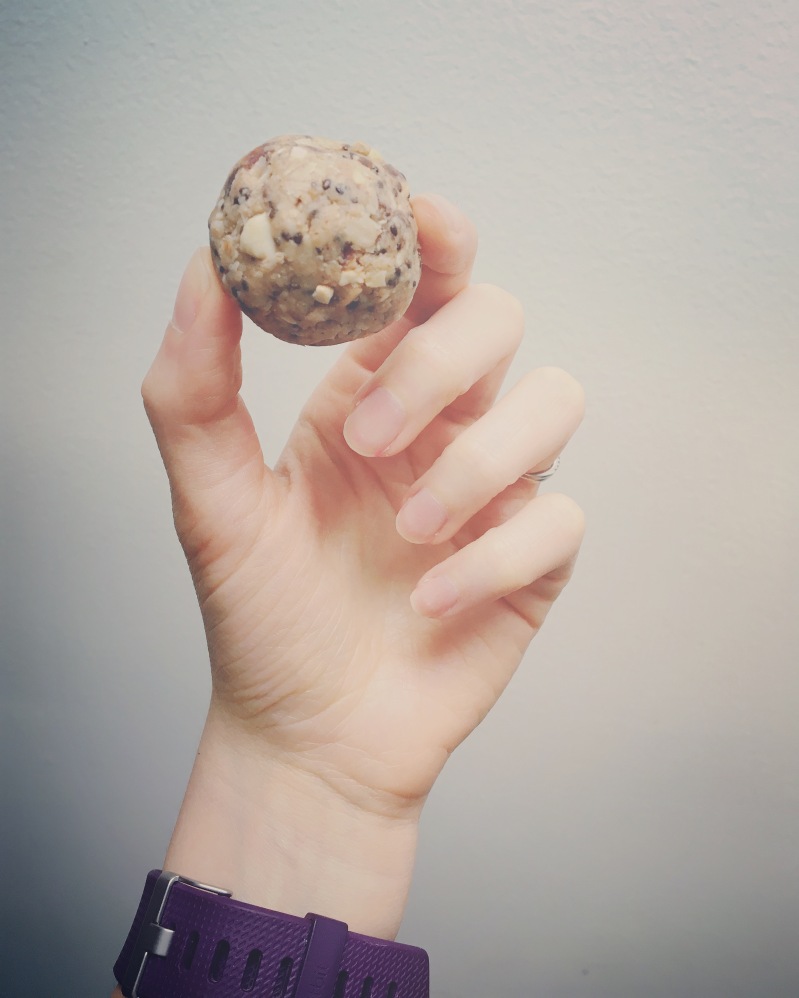
It’s like making cake pops and no bake cookies – but healthy. All the fun without the sugar – and they said it couldn’t be done.

Get creative with these little guys – use this recipe, or any other you come across, as a guide. Don’t have peanut butter, use almond butter. If ya don’t like raisins, use dried figs. I could keep going but I think you get it.

I’m sucker for basically any nut butter so whenever I see them on sale, one or the whole shelf ends up in my cart. (No MasterCard, those aren’t fraudulent charges. Meijer had organic sunbutter on sale.)

Speaking of finding nut butter on sale, Costco had a 2lb jar of Cashew butter priced at like $4 a few months back. In an amazing display of self-control, I only bought one. Which is a good thing because I swear there is no bottom to this jar.

Once I decided to make energy bites, I busted said cashew butter outta the fridge.

Pro tip: Not all nut butters have the same consistency. Adjust your wet ingredients until the right consistency of your “batter” is achieved. Basically, “wet” enough that they don’t crumble when you bit into them but not too “wet” where they lose their shape or leave your hands feeling really greasy or sticky.

{CC Energy Bites}

[Ingredients]

  • 1 cup cashew butter
  • 3/4 cup salted cashews
  • 3-4 pitted medjool dates
  • 1 cup old fashioned oats
  • 3 tbsp honey
  • 1 tbsp agave nectar
  • 1/2 tsp cinnamon
  • 3 tbsp unsweetened coconut flakes
  • 3 tbsp ground flax seed
  • 2 tbsp chia

[Directions]

  1. Add all ingredients to your blender or food processor. Pulse until combined and crumbly.
  2. Using a large cookie batter scoop, roll the dough in your hand to form bite size balls. Or press dough into a parchment lined baking dish.
  3. Store balls or bars in an airtight container in the fridge for up to 7 days.

Cheers,

Danielle

Carbs: A Love Story

Look at how cheeky I am this Friday. The name, the GIF – I’m really killing this post so far 🙂

But for real, let’s talk about every dieters worst enemy: carbs. Well, which is worse for dieters carbs or calories? Anyway….

Google basically anything about nutrition and you’re bound to have so much conflicting information coming your way, you’ll leave your computer questioning everything you know about life. Matters take a turn for the worst when carbs are included on said Google search.

I mean, the Ketogenic diet thing?! SMH forever at this. Unless you are a child with severe epilepsy or your doctor has recommended this diet to you, for the love of puppies do not try this. This craziness covers trends from Atkins to low-carb to the outright Ketogenic diet.

As much as I’m tempted to dig into this low-carb trend with you more, in this story it’s more like the guy you dated in high school for 2 weeks. Irrelevant.

So many of my patients come to me saying, “I rarely eat carbs,” “I know all carbs are bad,” “I’m so bad that I eat carbs.” You get the drift. My message to them is the same: Carbohydrates are not bad for you, in fact, they are the fuel your muscles use to keep you moving. They are your brain’s favorite food. It is the types of carbohydrates, the quantity, and the timing that matters.

I teach carb counting to almost all of my patients. Even if you aren’t pre-diabetic or have diabetes, carb counting will ensure you’re providing your body with the right amount of carbs, at the right time.

Consistency is key. When your body knows it will be receiving approximately the same amount of carbs at regular intervals throughout the day, it is better able to regulate blood sugars.

This will leave you feeling more satisfied and energized. Many patients, who were experiencing a plateau in their weight loss, begin losing weight again once they begin balancing their carbohydrate intake.

Now all this is fine and dandy, but how do you apply it? Good question.

First you need to decide how many calories per day you plan to eat. Let’s say you want to eat 1,800 calories per day. The average person should plan to “spend” 50-55% of the calories on carbohydrates.

Multiple 1800 by .5 or .55, depending on how much of your calorie budget you wish to spend on carbohydrates.

1800 x .5 = 900

Now divide your 900 calories by 4, since there are 4 calories per gram of carbohydrates.

900/4 = 225 gram of carbohydrates (or 15 choices, where 1 choice = 15 grams of carbs)

Now, you get to decide how you want to spend your 225 grams of carbohydrates.

This is where those simple and complex carbohydrates come in.

Image result for complex vs simple carbohydrates pun

Aside from deep reflections about life, what makes a complex carbohydrate so complex?

First, they are comprised of longer chains of polysaccharides, 3 or more. The longer chain takes more time for the body to break down. Think whole grain bread/rice/pasta/quinoa, potatoes with the skin on, peas, corn, beans and lentils.

Simple carbohydrates are made of a one to two glucose molecules. Because of this, it take little time for the body to break down and absorb the glucose which causes a spike in blood sugar. Think white bread, white rice, baked goods, soda and candy.

Fruit hangs out in both camps. While technically a simple carbohydrate, fruits are often included with complex carbohydrates as they are healthy source of fiber and other nutrients.

Ok, so now that you know how to calculate your carbohydrate needs and what the best sources of carbohydrates are! Spend you carb budget on what you’d like, aiming to eat the same amount of carbohydrates at meals and snacks spaced within 3 to 6 of each other. Just like with money, wise spending equates to better financial health. Wise spending of your carbohydrates, focusing on complex carbs, will equate to better physical health.

Now go enjoy the long weekend, free of carb guilt!

And, if you hadn’t figured it out yet… Butter is not a carb 🙂

Cheers,

Danielle

 

Progress > Perfection

As I’m sitting here trying to come up with a title for this blog post, I’m wishing that it could just be audio of the Backstreet Boys singing Everybody. Like the Backstreet Boys, I’m back 🙂

Since my last post, I’ve accepted a new job and passed my registration exam. I’m tempted to report that I’m finding an equilibrium but it would be a lie. Rather than hide the mess that my life often looks like, I’m going to share it with you. Because if I can find time (and enjoy it) to cook healthy meals, I know you can too!

Coming back to blogging, I went through some of my old posts. It was a fun way to see how I’ve progressed in cooking and communicating to you all about food and nutrition. Some of the habits I’d been working to kick to the curb, I’ve achieved (I’m looking at you coffee creamer)! What a beautiful reminder that progress is never linear, often slow, but absolutely achievable.

My focus and philosophy on food has changed a bit, too. The more I learn about food versus food like products, the stronger I feel about using my money to “vote” about what and how the food industry grows, makes, and distributes food. My definition of “processed foods” has expanded to cover a lot more than what it used to.

When purchasing food, I ask myself these questions:

1. Where did it come from and how far has it traveled? – A manufacturing plant or from the ground/tree/plant; another country/state or a local farm?

2. How was it grown? What chemicals were sprayed on the plant? Does the farmer that grew this food grow several crops or just a few?

3. Is this food going to benefit my body? Does it move me closer to my health goal or farther from it?

4. How does this food make me feel? Energized, content, healthy or sluggish and gross?

When I use these questions to make food choices, my pantry is filled with nutrient dense, often locally produced foods. Which means I’m supporting my local and state’s economy, reducing my carbon footprint, eating food at peak ripeness and often saving money.

And while I strive to make most of our food purchases that were grown not produced, have not traveled miles and miles, that benefit our bodies to leave us healthy and content – not all of them do.

Some packaged foods still make into the pantry and while my goal is to continue to reduce that, it’s totally fine that we have more than one bag of chips in the pantry. Because there are such things as moderation and mindfulness.

What I’ve come to learn and accept over the past year is that everything in life is about the process of progress not achieving perfection. I think this can be applied to just about any area of life. If we strive to continually learn and apply that knowledge to our lives, we will be setting ourselves up for success.

So, what now? Much of what I’ll be blogging about will stay the same. I love to cook and enjoy sharing the excitement and deliciousness of healthy cooking. I also love sharing how a healthy lifestyle, eating well and exercising, can dramatically impact and improve health.

I hope you tune in and join me on the journey!

Cheers,

Danielle


Packing the Perfect Lunch

Since we’re still in back to school month, I haven’t missed the bus on blogging about packing lunches. Not that this only applies this month… Packing your lunch (and snacks, for that matter) is a great way to ensure a tasty, healthy meal that will keep you going strong until the dinner bell rings.

I’ve been packing my lunch for sometime now. Having food allergies can really limit my options when eating out and a lot of times there are either no options or very limited options for me to choose from during the work week. If that wouldn’t deter me, the fact that eating out is so dang expensive would! I didn’t realize how much money you save by packing your lunch until I started doing so. I think we get a warped sense of “expensive” when we’re constantly eating out. “Only $9 for lunch?! What a bargain!” PSHHH – I can pack my lunch for like a week with nine bucks!

The real trick to packing lunch is planning. Let’s be honest, you have like 100 pins saved with amazing, healthy lunches that you still haven’t made. It’s time to break that cycle. I promise that packing your lunch doesn’t have to be time consuming or hard. For me, it’s usually take some kind of salad and then something salty or sweet to finish my meal. While I often buy whole ingredients, you can definitely save some time and a few steps by buying precut or pre-portioned items.

Below are some building blocks for creating the perfect lunch bag. These are just some of my favorites. Use the grid to create a delicious salad, sandwich, or bento box style lunch.

Build a Better Lunch

Protein

Fruit

Vegetable

Complex Carbohydrate

Hard boiled eggs Seasonal fruits Bell Peppers Popcorn
Cheese cubes Apples Carrots Quinoa
Nuts or Seeds Grapes Spinach Brown Rice
Hummus Clementines Zucchini Butternut Squash
Peanut Butter Pears Summer Squash Whole Grain Pasta
Chicken breast Peach Mushrooms Spaghetti squash
Ground turkey Plums Celery Pita bread
Beans or Lentils Berries Broccoli Whole Grain bread

Ok, the lunch base has been covered but we all know that when 3 o’clock rolls around a lot of us are riffling through our desk drawers and purses hoping to find enough change to get something from the vending machine.

Since you’ve already jumped onto the planning ahead bus, why not throw a quick snack into your bag, too?

When it comes to snacks, I want something I can reach into my pantry for and throw in lunch bag as I jot out the door. When I know I’ll be having a late day or a long commute home, snacks are a MUST. Hangry is a real thing, my friends, and I do not handle it well. You all know my love of popcorn and while I love using my stove top popper, some days I just need something that’s already made and portioned for me. As with any product now, there are lots of pre packaged popcorns to choose from but SkinnyPop is one of my favs. It’s a great choice for those of use with food allergies, as its made in a facility that is completely nut, egg, and dairy free. With only 3 ingredients, all of which I can pronounce, and 150 calories for almost 4 cups of popcorn, Skinny Pop is at the top of my list for snacks. Check out their website to see all of their fabulous flavors.

If you’re looking to balance your snack and take it to the next level, pair this healthy whole grain with a some kind of protein or even better create your own trail mix with SkinnyPop, sunflower seeds, and banana chips!

Happy Packing!

Cheers,

Danielle


Portabella Steaks with Avocado Pesto

Hi Guys!

I’ve really been missing posting and am working to make more time to share recipes and nutrition info with you all!

Fall is just around the corner and I’m hoping that with the change in season the pace of life will slow down a bit. I’ll wrapping up my internship in just a few weeks and while I’m excited, I also know it will feel very odd not having rotations to go to!

My next step will be to buckle down and hit the books so I can take my exam ASAP.

In the meantime, I’ll keep cooking (and posting) away 🙂

Portabella caps are one of my favorite things to cook.  They are easy to prep and only take a few minutes to cook. Read: when I get home from work ravenous, I reach for a portabella cap to throw together a satisfying and healthy meal.

{Portabella Steaks}

[Ingredients]

  • 2 Portabella mushroom caps
  • 2-3 TBSP soy sauce
  • 2-3 TBSP Worcestershire sauce
  • 1 TBSP EVOO
  • Salt and pepper, to taste

[Directions]

  1. Whisk together soy sauce, Worcestershire sauce, olive oil, and salt & pepper.
  2. Marinate caps for 15 to 20 minutes.
  3. Cook on a grill pan or grill over medium heat until tender.

{Avocado Pesto}

[Ingredients]

  • 1 avocado
  • 1/4 cup roasted sunflower seeds
  • 1/4 cup avocado oil
  • 5-10 basil leaves
  • 2-3 cloves garlic
  • lemon juice, to taste
  • salt and pepper, to taste

[Directions]

  1. To a food processor add basil leaves, garlic cloves, lemon juice, and avocado oil. Pulse until combined.
  2. Next, add sunflower seeds and avocado. Blend until smooth and combined. Season to taste with salt and pepper.

Cheers,

Danielle

Summer & Siggi’s

It feels like just yesterday summer started! I can’t believe how fast the last month has gone. In all the hustle and bustle of the summer, I haven’t been able to carve out enough time for my blog.

Rather than try to catch up all on the goings on of life recently, today’s post is going to be about a Siggi’s party I hosted about a month ago.

Check out their website for more information about what makes Siggi’s so great, aside from the flavor!

Yogurt is a powerhouse and can easily be incorporated into your diet. Think outside the parfait – yogurt can be used as a substitute for sour cream, cream cheese, milk – the list goes on…

Today’s recipe will be for Zoats made with filmjolk (kefir), Honey Mustard dressing made with skyr, and Tatziki sauce made with skyr.

ZOATS – guys this has been my go-to breakfast this summer! Its like the better half of overnight oats. While the combination of ingredients sounds odd – don’t let that stop you from trying! The filmjolk is a bit tangy so don’t skip out on sweetening your zoats with a drizzle of honey and some fruit. My favorite fruit toppings are bananas and blueberries. Like kefir, it is 99% Lactose free!

I’ve also been trying to use store bought dressing less and experimenting with home made dressings. While I still do not eat much dairy, I did have a little bit of this dressing and it is so much better than store bought Honey Mustard. It is really versatile and adds a sweet zing to dishes.

{Blueberry Peanut Butter Zoats}

[Ingredients]

  • 1/2 cup Siggi’s Vanilla filmjolk
  • 1/4 cup old fashion oats
  • 1 small zucchini, finely grated
  • 1 tsp chia seeds
  • 1 tbsp flax meal
  • 2 tbsp powdered peanut butter
  • 1/2 cup blueberries (or 1/2 banana, sliced)
  • dash of cinnamon
  • drizzle of honey

[Directions]

  1. Roughly chop zucchini. Place in food processor and pulse until finely shredded.
  2. Pour shredded zucchini into a resealable container. Add remaining ingredients. Mix until well combined.
  3. Refrigerate overnight and enjoy in the morning!

{Broccoli Salad}

[Ingredients]

For salad:

  • 1 head of broccoli
  • 1/8 cup roasted sunflower seeds
  • 1/8 cup slivered almonds
  • 1/4 cup Craisins
  • 1 package shredded radishes
  • 1 apple, diced
  • 1/4 red onion, diced
  • 1 package shredded carrots

For dressing:

  • 1/2 cup plain yogurt
  • 3 tbsp mustard
  • 3 tbsp honey
  • 1 clove garlic, minced
  • pinch of salt and pepper

[Directions]

  1. Coarsely chop broccoli into bite size pieces.
  2. Add broccoli and remaining salad ingredients to a large bowl.
  3. Using tongs mix the salad together.
  4. In a medium bowl, mix together dressing ingredients until well combined.
  5. Pour dressing over salad mixture and toss to coat.

{Yogurt Tzatziki}

[Ingredients]

  • 1 1/2 cups plain yogurt
  • Juice from half a lemon
  • 1 tbsp fresh dill
  • 1 small clove garlic, minced
  • 1 cup peeled, seeded, diced cucumber

[Directions]

  1. Using a vegetable peeler, remove the skin of the cumber. Cut in half to seed.
  2. Quarter then slice cucumber. Add to a medium bowl.
  3. Rinse dill then add about a tablespoon of fresh sprigs to the bowl.
  4. Top with yogurt, lemon juice, and garlic.
  5. Mix until ingredients are combined.
  6. Use to top chicken, fish, or roasted vegetables.

Cheers,

Danielle

Wilted Greens Soup

Summer isn’t really hot soup season but it is cold soup season – gazpacho any one?

My intent was to make this soup tasty chilled or warm, but it was my first go at this style and I preferred it warm. Not such a bad thing, as it turns out, because while summer is certainly hot outside, it is all too often FREEZING inside thanks to the A/C.

Inspired by this recipe, I put my sad, somewhat soggy, Spring Mix to good use. Upon further inspection, I found several other veggies who had seen better days. Throwing caution to the wind, everything on it’s last leg was added to the soup.

Being dairy free has expanded my culinary skills and creativity. How to make a soup rich and creamy without cheese or milk? Cashews, of course. And in this case, cashews and a few Brazil nuts. Cashew cream (soaked then pureed cashews) are often used to replace cheese and cream in vegan recipes. I’ve used it in several dishes and love the rich, creamy nuttiness it adds. I’m beginning to experiment with other nuts to see how they compare.

An emulsion blender or high-speed blender is required for this recipe. I made the soup super creamy, but if you prefer more texture you can always blend half and leave the other portion unblended.


The type of greens and veggies you use will affect the color of your soup. My spring mix was full of dark greens and deep purples, that in combination with the other vegetables gave my soup a rather unappealing brownish color. However, once the cashew cream was added, it became a light mossy color. Perhaps not the prettiest, but it was flavorful and kept me from throwing away food. Win, win in my book.

{Wilted Greens Soup}

[Ingredients]

  • ~2 cups wilted greens
  • 2-3 carrots
  • 1 summer squash
  • 1 fire roasted red pepper or bell pepper
  • 1/3 cup cashews + 2-3 Brazil nuts
  • 2-3 stalks celery
  • 2 cloves garlic
  • 1/4 red onion
  • 1 can chickpeas, undrained
  • 1 carton vegetable stock
  • 1 TBSP fresh basil
  • Salt & pepper to taste
  • ~1/2 TBSP herbes de provence
  • 1-2 TBSP olive oil
  • 2 TBSP tahini

[Directions]

  1. Add cashews + brazil nuts to a deep bowl. Cover with water, soak for at least one hour.
  2. Rinse and coarsely chop veggies.
  3. Add olive oil to pan, heat over a medium flame then saute onion until tender and translucent.
  4. Add summer squash, bell pepper, and carrots. Salt & pepper to taste. Cook for 5-10 minutes.
  5. Add greens, chickpeas along with the fluid from the can, garlic, and stock.
  6. Stir in basil and herbes de provence. Cover and allow to simmer for 30-45 minutes.
  7. Once nuts have soaked for at least an hour, drain most of the water from the dish then add the nuts and remaining water along with the tahini to a food processor. Blend until smooth.
  8. Using an emulsion blender or regular blender, blend soup until smooth. Add cashew cream and stir until well incorporated.

Note: my husband added a dash of Sriracha to his to give it some spice.

Cheers,

Danielle

Living Your Best Life

I sometimes forget that you all are out there reading what I put on my blog. I’m truly flattered when someone reaches out to comment, like, or present an opportunity to continue to spread the word about health, wellness, and nutrition. Last week Cotopaxi contacted me with an amazing opportunity to share the infographic at the bottom of this post about health and wellness.

This got me thinking about the little ways that make a healthy lifestyle enjoyable and sustainable in a culture that makes it very easy to live, well, lazily.

As I started to brain storm, I began to realize that these little habits make up a big part of my day and when I don’t do them, I can tell.

For example, getting up to exercise in the morning sets the mood for my day. When I don’t, I often feel sluggish and moody. I strive to exercise or be active daily but usually night workouts feel less like “me” time and more like a chore. When I know I can’t make a morning workout happen, I try to find a buddy for my evening exercise. This shifts it back into “me” time and ensures that I will (1) show up to the gym (2) stay for my full workout (3) push myself just as hard as I would have that morning.

Almost every day, I pack myself breakfast and lunch. I do my best to plan ahead the night before to have it packaged, ready to grab in the morning, throw in my cooler and head out the door. When I don’t make time to do this the night before, it seriously slows me down in the morning – often cutting into my morning workout time. By planning ahead to have it ready, my morning starts off feeling prepped and ready to take on the day. For me, knowing that I’ve invested time and energy into what I’m bringing to fuel my day also leaves me feeling empowered. Further, having my lunch (and breakfast) packed significantly reduces the temptation to eat out which saves me calories and money. Now there is a win-win!

There are days when the stress of work and life get to me. On those days, I try my best to do some quality “self” care. Cooking, baking, or taking a long walk outside are my top 3 cures. My husband has become very good at knowing when I just need some time alone in the kitchen. I put on a show, audiobook, or music and spend some time re-organizing my fridge and cupboards then creating a meal with the things that need to be used before they go bad or expire.

What’s more comforting than the delicious smell of cookies or cake? Even if the recipe isn’t gluten-free, there is something very calming about the specific steps of baking. I like to try challenging recipes that require a lot of attention on days when I really need to refocus my brain. By having to concentrate and put all my energy on creating whatever recipe I’m baking, I can stop worrying about the stress of my day.

I grew up just minutes from Lake Michigan and while I love where I live now, I will never love it as much as my hometown. Being able to walk to the beach after a long, hard day is the best cure. There is a saying, “The cure for anything is saltwater, sweat, tears, or the sea.” Even though Lake Michigan is fresh water, I can’t agree with quote more. Going for a walk or run on the beach or having a good cry plopped down in the sand leaves me feeling much better. There is something incredibly calming and grounding about the beach for me.

What are some ways you live a healthy lifestyle and how do they impact your daily routine?

Cheers,
Daniellecotopaxi_whd_v04


Fish Tacos

My last trip to Costco I opted to buy Mahi Mahi instead of Salmon. We had been eating so much Salmon and the Mahi was a bit less expensive so I went for it.

If you’ve never tried Mahi Mahi it is a mild white fish. I would say that it holds up better when cooking than Salmon does. Meaning it is more firm with a “meaty” consistency.  Even when slightly overcooked, Mahi doesn’t seem to develop a strong fishy taste.

Shortly after our Mahi purchase, Dan and I went out for dinner and Dan ordered Mahi. I was surprised when the bill came to find out his dish was $19! That’s the price of a whole package of Mahi at Costco! Just goes to show, eating at home will save you money and calories!

The next time you get the hankering for fish tacos or Mahi, give this recipe a whirl…

{Mahi Mahi Fish Tacos}

[Ingredients]

Serves 6

  • 4 Filets Mahi Mahi
  • 1 1/2 TBSP Taco Seasoning (I used Pampered Chef Fiesta Seasoning)
  • Chili powder and Paprika, to taste
  • 1/2 cup Pineapple juice
  • 1/2 cup Salsa
  • 1/2 red onion
  • 1 clove garlic
  • 1 TBSP EVOO

[Directions]

  1. Heat EVOO in a cast iron skillet or in a heavy bottom pan over medium heat. Add onion and sauté until tender. Once onion is tender, add garlic.
  2. Place Mahi in pan and season generously with taco seasoning spices. Cook for 3 minutes then flip.
  3. Add pineapple juice and salsa to pan and continue to cook until fish flakes and is opaque.
  4. Reduce heat to low, flake fish and add salsa. Simmer for 5 to 10 minutes.

{Zesty Brussels Slaw}

[Ingredients]

  • 8 oz. Brussels sprouts
  • 1 fire roasted yellow pepper
  • 1/2 cup mango, diced
  • 2-3 sprigs cilantro
  • 1/4 cup pineapple juice
  • 1/4 cup match stick radishes
  • Dash of cayenne pepper
  • Pinch of salt

[Directions]

  1. Remove stems from sprouts then halve. Add to food processor and pulse until finely chopped. Add to a medium bowl.
  2. Dice yellow pepper. Dice mango. Add to bowl.
  3. Mix pineapple juice, radishes, and cilantro into brussels.
  4. Season with cayenne and salt.


Serve with rice, tortillas, avocado slices, and black beans.

Cheers,

Danielle


Summer Garden Salad

Basic doesn’t mean tasteless. Sometimes keeping things simple, combining a few fresh ingredients makes the best dishes.

This salad is perfect for backyard gardeners as all but one ingredient can be found in most gardens. A pluck, wash, chop and eat salad that can be thrown together in a few minutes, this may be a new favorite.

{Summer Garden Salad}

[Ingredients]

  • 1 cucumber
  • 3-4 Tomatoes
  • Basil leaves, chopped
  • 1 fire roasted yellow pepper (You can do this at home, just follow this recipe)
  • 1 clove garlic

[Directions]

  1. Slice cucumber and tomato; place in bowl.
  2. Coarsely chop basil leaves. Finely dice garlic. Add to bowl.
  3. Chop roasted yellow pepper. Add to bowl and mix well.
  4. Chill for at least 30 minutes before serving for best flavor.

Cheers,

Danielle